Installing Ubuntu on Windows 11 with python support on VirtualBox
Installing Ubuntu on Windows 11 through virtualization
Hello, I am going to describe the steps to installing ubuntu on windows 11 on VirtualBox
I hope you find this guide useful.
If you already have VirtualBox, you may skip to step 5.
Step 1:
Download virtual box

Select 'windows hosts'

If you want python support and you don't have the required resources, there are some additional steps to be followed, otherwise skip to step 4

Step 2:
Download and install python
Download and install python
Click on add python.exe to PATH

If all went well, you should end up with:

Step 3:
Once python is installed, open cmd and execute the below command:
pip install pywin32
It should look like this:

Proceed with virtual box installation

Step 5:
Click on 'Install Ubuntu'
On the Installation type page since we are installing ubuntu on a virtually we do not need to change this setting.

Click on show application(The 9 small squares) and click on terminal

In the terminal enter these 2 commands:

A disc will be added to sidebar on the left, click on it

Once done, press [Enter]

You have successfully installed ubuntu on windows 11 through virtual box
Open and Install VirtualBox
This is how it should look when you open VirtualBox after installation
Download Ubuntu


Click on settings >> storage

Click on 'choose a disk file...' and go to where you have downloaded the ISO file
LTS(Long Term Support) version is highly recommended
This is a very large file, therefore, it might take up quite some time to download
Step 6:
Once downloaded and placed in the desired location
Open VirtualBox and click on 'New', this will prompt this menu
Fill in the name, the directory, the type and the version and click on Next
Step 7:
Adjust the allocated memory and processors for the virtual machine
It is recommended to the set the slider in the green part because this is what your system physically has.

The remaining settings can be left to their default value

When you are done, it should look like this:

Step 8:
When you are done, it should look like this:
Step 8:
Providing the location of the ISO file downloaded in Step 5
Under Controller: IDE, there should be 'Empty', click on it
Click on the disc icon on the right
Select the file.
Click on 'OK'
Step 9:
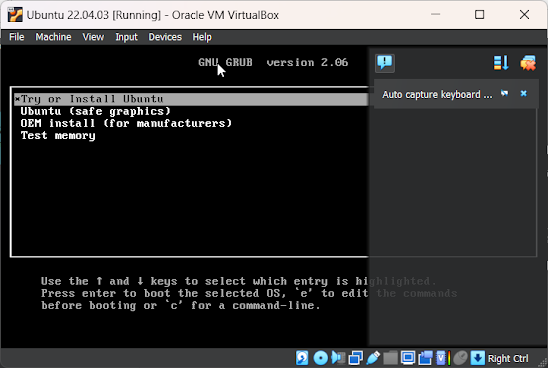
Select the virtual machine and click on 'Start'
Use arrow keys to navigate and select 'Try or Install Ubuntu' and press [Enter]
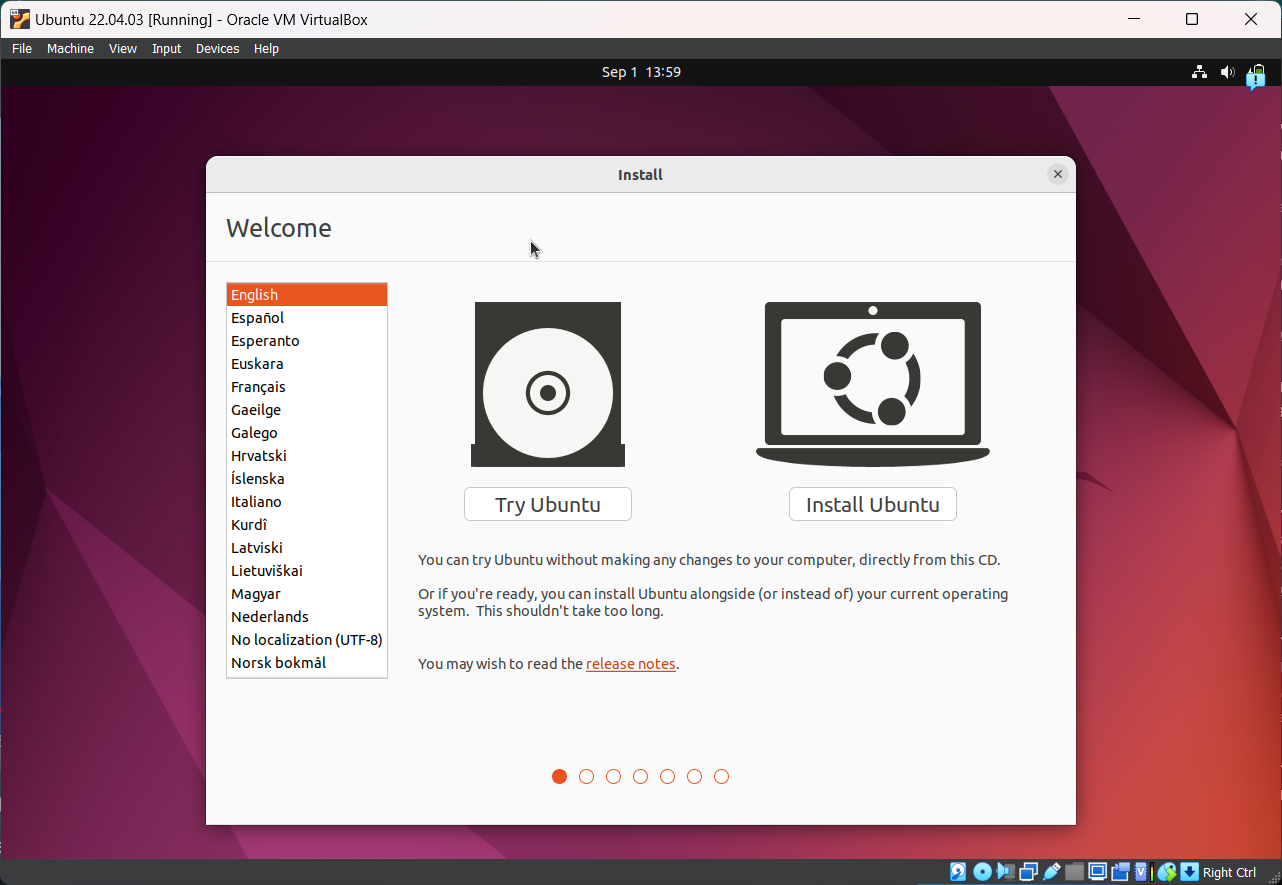
Click on 'Install Ubuntu'
Select the keyboard layout of your keyboard
Select 'Install third-party software' and what you need.
On the Installation type page since we are installing ubuntu on a virtually we do not need to change this setting.
Click on 'Install Now'
Select your time zone and fill in the required details
Once the installation is done, Click on 'Restart Now'
Step 10:
If there is a software updater window, click on 'Remind me later'
Connect your accounts if desired;
Otherwise skip.
Step 11:
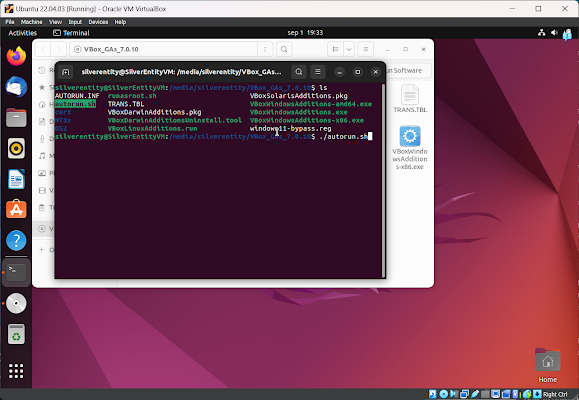
VirtualBox guest additions
Since the window does not change according to the size of the desktop
In the terminal enter these 2 commands:
sudo apt update
sudo apt install build-essential dkms linux-headers-$(uname -r)
on the second command you will be prompted with a Y/N(yes/no), input 'Y' and click [Enter]
On Devices, click on Insert Guest Additions
A disc will be added to sidebar on the left, click on it
Now, in the folder and click on 'open in Terminal'
You can do ls in the terminal to see the file name
From here you are going to execute ./autorun.sh (name of the file)
Once done, press [Enter]
Step 12:
Restart Ubuntu
Click on the top right corner >> Power Off / Log Out >> Restart
You have successfully installed ubuntu on windows 11 through virtual box


Comments
Post a Comment